Monday, 31 March 2025

One swipe One pump makeup technique…

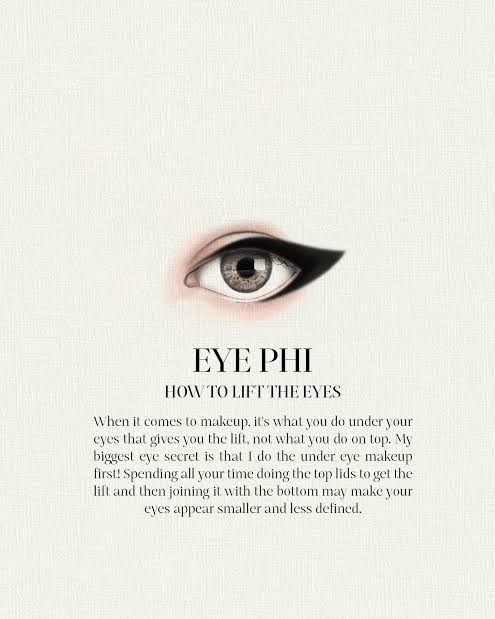
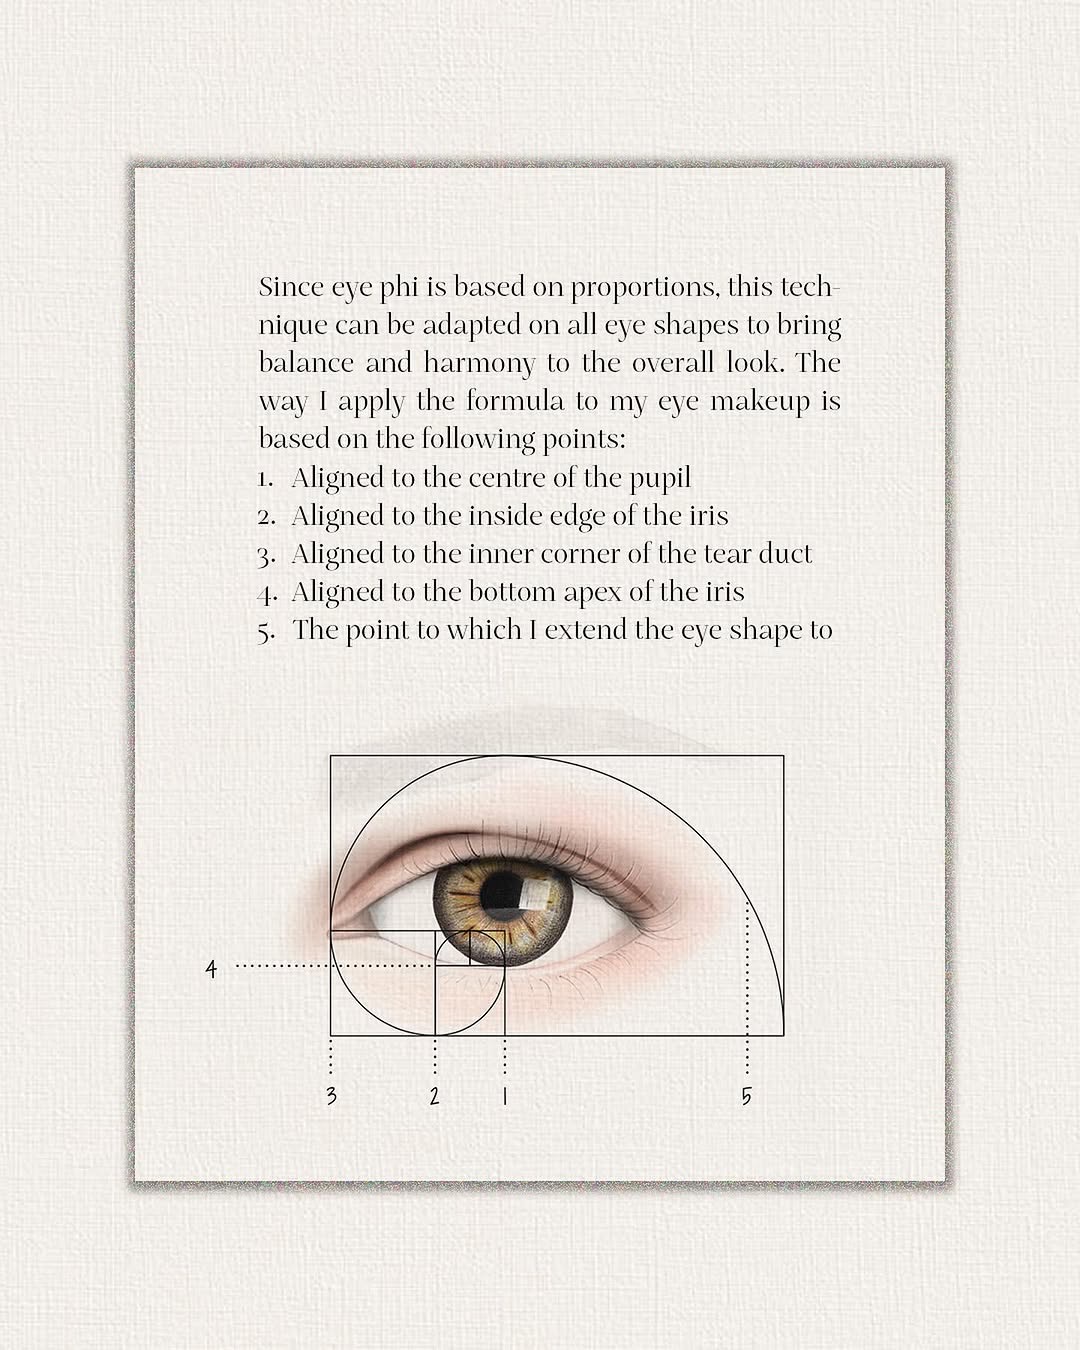
The “one swipe, one pump” makeup application technique isn’t a widely standardized term in the beauty industry, but based on context from makeup application methods and product descriptions, it likely refers to a minimalist, efficient approach to applying makeup. It suggests using a single pump of a liquid product (like foundation, primer, or tinted moisturizer) and a single swipe of a complementary product (like blush, eyeshadow, or highlighter) to achieve a quick, polished look. This technique aligns with trends toward simplicity and time-saving routines, often seen in “one-swipe” products or tutorials emphasizing minimal effort for maximum impact.

How It Might Work

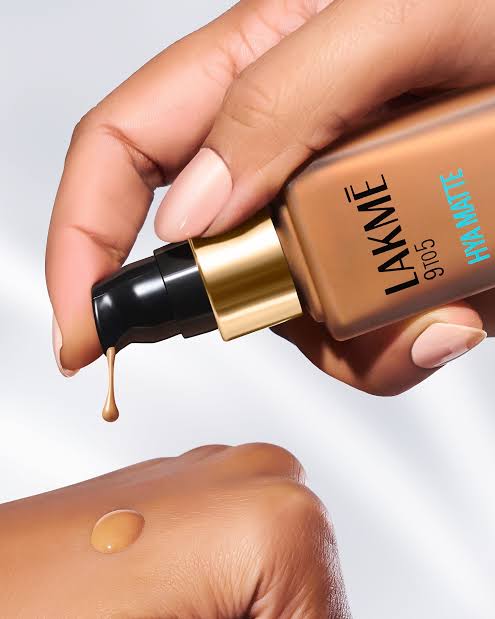
  1. One Pump: Dispense a single pump of a liquid base product—say, foundation or a skin tint—onto your fingers, a brush, or a sponge. Apply it evenly across your face for light, natural coverage. The idea is to use just enough product to even out your skin tone without layering excessively.
  2. Example: A pump of Charlotte Tilbury’s Beautiful Skin Foundation, blended outward from the center of the face.
  3. One Swipe: Follow with a single swipe of a stick, cream, or powder product to add color or definition. This could mean swiping a cream blush stick across your cheeks, a shadow stick over your eyelids, or a highlighter along your cheekbones, then blending lightly with fingers or a tool.
  4. Example: A swipe of Maybelline Master Glaze blush stick on the apples of your cheeks, blended with fingertips.

Why It’s Effective

  1. Speed: Ideal for busy mornings or on-the-go touch-ups, cutting down application time to minutes.
  2. Simplicity: Perfect for beginners or those who prefer a low-maintenance routine, requiring minimal tools (often just fingers).
  3. Natural Finish: Using small amounts of product avoids a heavy, caked-on look, aligning with the “no-makeup makeup” trend.

Possible Origins

The phrase echoes marketing for products like L’OrĂ©al Paris The One Sweep™ Eye Shadow (discontinued but notable for its one-swipe applicator) or articles highlighting “one-swipe wonders” (e.g., Makeup.com’s 2016 piece on easy-to-use makeup). It could also tie to techniques from pros like Rae Morris, who emphasize precision and efficiency, though she doesn’t use this exact phrasing.

Practical Example

  1. Step 1: Pump one dose of a lightweight foundation (e.g., 0.5-1 mL, depending on the dispenser) and dot it on your forehead, cheeks, and chin. Blend with fingers or a damp sponge.
  2. Step 2: Swipe a cream eyeshadow stick (e.g., Armani Eyes to Kill in a neutral shade) across your lids, blending edges with a fingertip. Add mascara if desired.
  3. Result: A fresh, cohesive look in under two minutes.

This technique isn’t rigid—adjust the “swipe” and “pump” to suit your needs (e.g., swapping blush for bronzer). It’s about streamlining your routine while keeping it effective, leveraging products designed for quick, single-motion payoff.

New Eye Makeup Technique for Advanced Makeup Artists

Leonardo da Vinci’s fascination with the Golden Ratio (approximately 1.618), often explored in his anatomical sketches and artistic compositions, provides a framework for creating balanced, harmonious eye makeup. While he didn’t design makeup techniques, we can apply the Golden Ratio—where a larger segment divided by a smaller one equals 1.618—to enhance the eye’s natural proportions. Here’s how to do it:

Step-by-Step Guide

  1. Prep the Eye: Start with a clean, primed eyelid and a neutral base shadow (e.g., beige) to unify the skin tone. This sets up a clear “canvas,” much like Leonardo’s preparation for proportional drawings.
  2. Map the Golden Ratio:
  3. Imagine a horizontal line across your eye from the inner corner to the outer edge. Divide it so the longer part (outer eye) is about 1.618 times the shorter part (inner eye). This split often falls near the outer edge of your iris when facing forward.
  4. Vertically, consider the space from your lash line to brow. The crease-to-lash-line distance should ideally be about 1.618 times smaller than the crease-to-brow distance.
  5. Eyeshadow Application:
  6. Inner Section (Shorter Part): Apply a light shade (e.g., cream or pale gold) to the inner third of the lid, up to that Golden Ratio split. This brightens and opens the eye.
  7. Outer Section (Longer Part): Use a medium shade (e.g., warm brown or mauve) from the outer iris to the outer corner, blending slightly upward and outward. This emphasizes the larger segment for depth.
  8. Crease Definition: With a deeper shade (e.g., espresso or plum), shade the crease, keeping its width roughly 1.618 times the height of the lid shadow below it. Blend softly to follow the eye’s natural arc.
  9. Eyeliner Proportions:
  10. Along the upper lash line, start with a thin line at the inner corner, thickening it as you reach the Golden Ratio point (near the outer iris). Peak the thickness there, then taper into a subtle wing if desired—keep the wing’s length about 1.618 times the liner’s widest point.
  11. For the lower lash line, apply a light shadow or liner only on the outer two-thirds, reinforcing the outward focus.
  12. Brow Bone Highlight: Dab a highlighter (e.g., shimmery white) under the brow’s arch. Position it so the distance from the brow peak to the crease is about 1.618 times the crease-to-lid distance, lifting the eye proportionally.
  13. Lashes for Balance:
  14. Curl your lashes to echo Leonardo’s love of natural curves. Apply mascara, concentrating more on the outer lashes—aim for their length or density to visually appear 1.618 times that of the inner lashes. This elongates the eye harmoniously.
  15. Assess and Adjust: Step back and check the overall effect. The makeup should flow naturally, with the outer eye drawing slightly more attention while the inner brightness balances it. Blend edges for a soft, sfumato-like finish—Leonardo’s signature technique of seamless transitions.

Why This Works

The Golden Ratio creates visual appeal because it mirrors proportions found in nature and the human face, which Leonardo studied extensively. By aligning shadow, liner, and lash emphasis with this ratio, you enhance the eye’s shape without forcing it—think of it as framing the Mona Lisa’s gaze. The result is subtle yet striking, with a balanced distribution of light and depth.

Tips for Success

  1. Use a brush or pencil to estimate the 1:1.618 split if you’re new to it.
  2. Stick to a simple color palette (e.g., nudes or earth tones) to master the technique before experimenting.
  3. Your eye shape might tweak the exact points—adjust slightly to flatter your features.

This method blends art and science, channeling Leonardo’s genius into a practical, elegant look. Play with it to find your perfect balance!

Let’s see Rae Morris’ Universally flattering eye makeup technique called ‘Eye Phi’.

The Eye Phi Technique by Rae Morris is a makeup method inspired by the Golden Ratio (approximately 1.618), often referred to as “Phi,” which she adapts to create a universally flattering eye look. Morris, an acclaimed Australian makeup artist, developed this technique to enhance the eye’s natural shape, aiming for an almond-like, “Egyptian goddess” aesthetic that lifts and elongates the eye. It’s detailed in her book Makeup Masterclass (2016) and various tutorials, focusing on precise placement of eyeshadow, liner, and highlights based on proportional principles Leonardo da Vinci also explored in his work.

How to Apply the Eye Phi Technique

Here’s a breakdown of the technique, adapted for practical use:

  1. Understand the Proportions:
  2. The Golden Ratio splits a distance so the longer part divided by the shorter equals 1.618. For the eye, imagine a horizontal line from the inner corner to the outer edge. The “Phi point” typically lands near the outer edge of the iris or just beyond when looking straight ahead—this is where emphasis shifts.
  3. Prep the Eye:
  4. Start with a primed lid and a neutral base shadow (e.g., a skin-tone shade) to even out discoloration, setting the stage for clean placement.
  5. Eyeshadow Application:
  6. Inner Corner (Shorter Segment): Apply a light shade (e.g., ivory or champagne) from the inner corner to roughly the Phi point (outer iris). This brightens and opens the eye.
  7. Outer Corner (Longer Segment): Use a medium shade (e.g., taupe or soft gray) from the Phi point outward, blending slightly above the crease and toward the outer edge. This builds depth where the eye naturally extends.
  8. Crease Accent: With a darker shade (e.g., charcoal or deep brown), define the crease, focusing on the outer half. Blend upward and outward, keeping the shadow’s height about 1.618 times the lid’s visible space for balance.
  9. Eyeliner Placement:
  10. Draw a thin line along the upper lash line, starting subtle at the inner corner and thickening toward the Phi point. Extend it into a soft wing, keeping the wing’s length roughly 1.618 times the liner’s thickest width.
  11. Optionally, apply a faint line or shadow under the lower lash line, but only on the outer two-thirds, reinforcing the outward lift.
  12. Highlight Strategically:
  13. Add a shimmer or light shade to the brow bone under the arch and a tiny dot at the inner corner. The brow highlight should sit so the distance from brow peak to crease feels proportionally longer (about 1.618 times the crease-to-lid space).
  14. Lashes for Emphasis:
  15. Curl lashes and apply mascara, focusing extra volume or length on the outer lashes to visually stretch the eye outward in line with the Phi proportion.
  16. Blend and Refine:
  17. Blend edges softly—think of Leonardo’s sfumato—to avoid harsh lines. The goal is a seamless gradient that lifts the eye naturally.

Why It’s Effective

Morris ties this technique to the Golden Ratio’s presence in nature and art, suggesting it taps into an innate sense of beauty. By concentrating depth and length on the outer eye while keeping the inner area light, it creates an almond shape that suits most eye types—hooded, round, or almond—though adjustments may be needed. For example, hooded eyes might require less crease shadow to avoid heaviness, while round eyes benefit from a stronger outer wing.

Tips from Morris’ Approach

  1. Use reference points like the pupil’s center or iris edge to find your Phi split if measuring feels tricky.
  2. Morris emphasizes this works across ages and eye shapes, but practice tweaking for your unique features—e.g., lifting the outer shadow higher for downturned eyes.
  3. Her tutorials often pair this with her Jishaku brushes, though any precise tools work.

This technique isn’t about rigid math but about using the Golden Ratio as a guide for intuitive, flattering placement. It’s gained attention through demos by Morris and others like Wayne Goss, who showcased it on YouTube, sparking buzz for its “scientific” yet artistic appeal. Try it with a simple palette first to nail the flow!

Sunday, 30 March 2025

Going Natural……

There are days when you want to simply look amazing and not do too much to do so. And then there are days when you go out all glam!! The former are most common thence showing and sharing some tips to do that ultra natural simple makeup.

Let us also understand what is the difference between Natural and Neutral makeup.

The difference between natural and neutral makeup lies in their purpose and color choices:

• Natural Makeup: Aims to enhance your features while making it seem like you’re wearing little to no makeup. It uses soft, skin-like tones (peach, pink, brown) and lightweight products to create a fresh, dewy, or barely-there look.

• Neutral Makeup: Focuses on using neutral shades (beige, taupe, brown, soft pinks) that suit all skin tones. It can be subtle or bold but stays within an earthy, muted palette.

In short, natural makeup is about looking effortless, while neutral makeup is about using balanced, earthy colors.

Natural Makeup

To achieve an ultra-natural, simple day makeup look, follow these steps for a fresh and effortless appearance:

1. Skin Prep (Key to a Natural Look!)

• Cleanse and moisturize for a smooth base.

• Apply sunscreen (essential for daytime wear).

• Use a lightweight primer (optional, for longevity).

2. Base (Less is More!)

• Use a tinted moisturizer, skin tint, or light BB/CC cream instead of foundation.

• Spot conceal only where needed (undereye, blemishes, redness). Blend well.

• If needed, apply a tiny amount of translucent powder to control shine.

3. Brows (Soft and Defined)

• Use a clear or tinted brow gel to brush them up naturally.

• Fill in sparse areas with a fine brow pencil or brow powder, using light strokes.

4. Eyes (Minimal but Awake!)

• Curl your lashes to open up your eyes.

• Apply a brown or clear mascara for a softer, natural effect.

• Optional: Use a light taupe or peach eyeshadow for a subtle wash of color.

5. Cheeks (Healthy Glow)

• Use a cream blush (peach, pink, or nude tones) and blend it into the apples of your cheeks.

• For a natural glow, dab a liquid or cream highlighter on high points of the face (cheekbones, nose bridge, brow bone).

6. Lips (Soft and Hydrated)

• Apply a tinted lip balm, lip oil, or sheer lipstick in a “my lips but better” shade.

7. Final Touches

• Set with a hydrating mist for a fresh, dewy finish.

• If you have oily skin, lightly dust translucent powder on the T-zone.

This routine enhances your natural features without looking heavy—perfect for an effortless, everyday glow!

So when I did this look for Renee Cosmetics Lumiglow sunscreen ad I did the most minimal makeup ever!

Since the Pune based model Oshin’s skin was beautiful and had a naturally red color to her cheeks due to her North Indian genes, I opted for creamy products to make it look good and last long. I used my favourite Viseart concealer and corrector palette to make her skin look like no makeup. For her eyes I used the amazing Rom&nd Pampas Garden eyeshadow palette that has the most alluring mattes to make it all look like no makeup look (that’s my speciality). I used Maybelline Sky high mascara in cosmic black and combed the lashes for that barely there look. My Medium brown brow duo from Anastasia Beverly Hills to define brows thinly. I just applied the Etude house Lip and Cheek tint on cheeks and lips with some Laneige Lip balm. I set the makeup with a loose powder from a Chinese brand called Florasis and just love how glowy it was.

Hope you loved this simple look. Do comment if you like the post.

Till then,

Ciao

Neeraj

Welcome to my world again…. New blog and new memories powered with AI

Hey

This is Dr. Neeraj Navare - a physician turned cosmetologist turned professional makeup artist.

Welcome to the enchanting world of makeup, where creativity knows no bounds and every brushstroke tells a story! I’m thrilled to invite you into my little corner of beauty, a space dedicated to exploring the art, science, and joy of makeup. Whether you’re a seasoned pro or a curious beginner, this blog is your gateway to discovering stunning looks, mastering techniques, and uncovering the latest trends. From bold, vibrant hues to soft, natural glows, we’ll dive into the magic of transformation—because makeup is more than just products; it’s a celebration of self-expression. So, grab your favorite lipstick, settle in, and let’s embark on this glamorous journey together!

It seems you’re interested in Neeraj Navare, a notable name in the makeup artistry world! Based on available information, Neeraj Navare is a celebrated makeup artist primarily known for his work in Mumbai, India. With over twelve years of experience, he has built a reputation as a skilled professional, having trained at the Christine Valmy International School of Esthetics. His expertise shines in bridal and celebrity makeup, using high-quality, often cruelty-free brands like Pat McGrath, Too Faced, Charlotte Tilbury, and Dior, tailored to enhance natural beauty with precision and care.

Neeraj is particularly renowned for his bridal services, offering customized looks for weddings, engagements, and other events, with a focus on understanding his clients’ preferences. His approachable demeanor and willingness to travel across India have earned him praise from brides who describe their wedding looks as “magnetic” and “flawless.” Beyond weddings, he has worked on fashion shoots, including with personalities like Remo D’Souza, Karan Kundrra, Tejasswi Prakash etc and has a background in backstage assistance at fashion shows. His early blogging on platforms like Beauty Traveller showcased his passion for makeup techniques, such as creating crease effects and seasonal looks inspired by mythology.

Clients highlight his professionalism, hygiene standards (notably during challenging times like COVID), and ability to deliver long-lasting makeup without touch-ups. He also offers additional services like hairstyling, draping, and even skincare guidance, helping brides prepare for their big day. If you’re looking to connect with him for an event, he’s listed on platforms like Wedmegood and StarClinch, where you can request quotes or check availability.

Btw, this is what an app called Grok 3 wrote about me! Hahaha

Let’s start blogging and let’s start doing amazing things over here…. Once again

Best of Prada beauty

Prada Beauty’s standout products in 2025 combine innovative technology, luxurious textures, and sustainable design, aligning with modern ma...